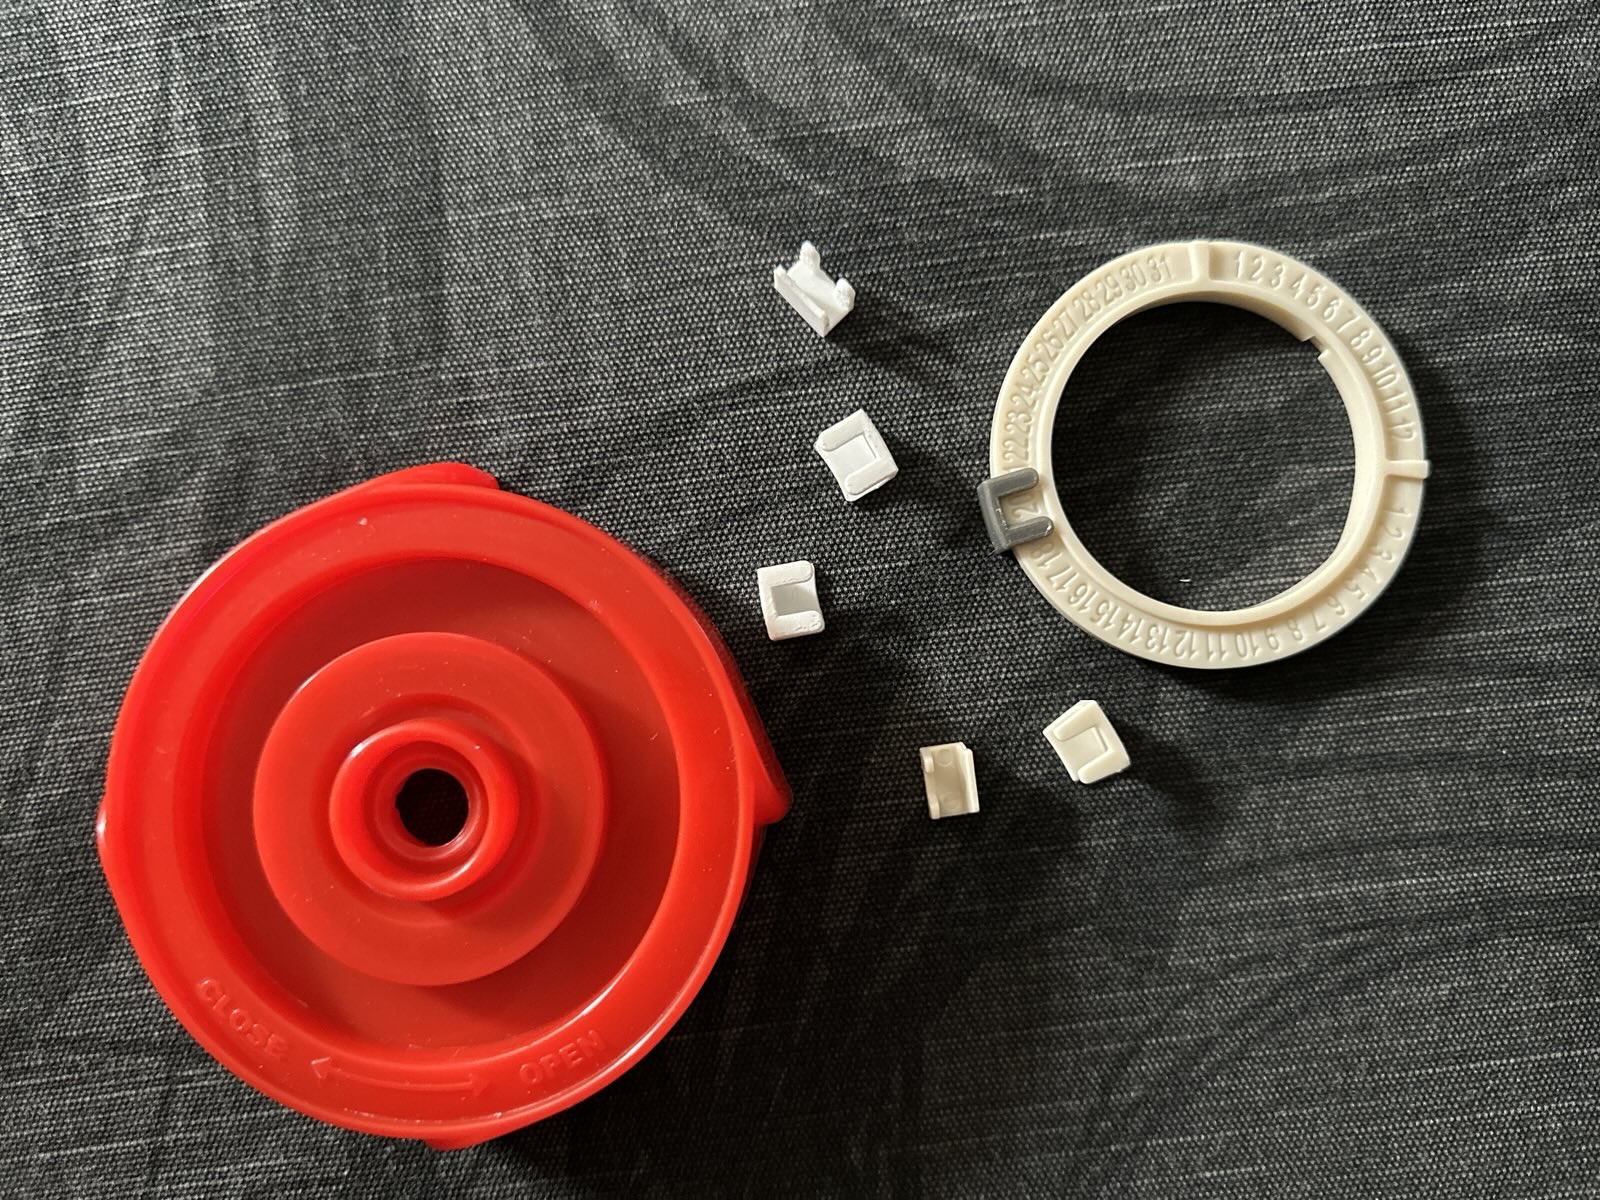
While washing up, one of the date slides on the fermentation attachment of my
Fairment jars took a trip down the drain. There was no way of getting the part separately, so I made some myself. Maybe
this spare part will help someone else.
I used
Overture PETG for printing.
Transparency: I bought the products discussed in this post myself and I do not receive any benefits from the companies mentioned. Some of the links in this post refer to
affiliate links. If you buy one of the linked products, you are supporting me. The product itself will not cost you any more than usual. Thank you very much.
Transparenz: Die in diesem Beitrag besprochenen Produkte habe ich mir selbst gekauft und ich erhalte keine Zuwendungen der genannten Firmen. Einige der Links in diesem Beitrag beziehen sich auf
Affiliate-Links. Wenn Sie eines der verlinkten Produkte kaufen, unterstützen Sie mich. Das Produkt selbst wird Sie nicht mehr kosten als üblich. Vielen Dank dafür.
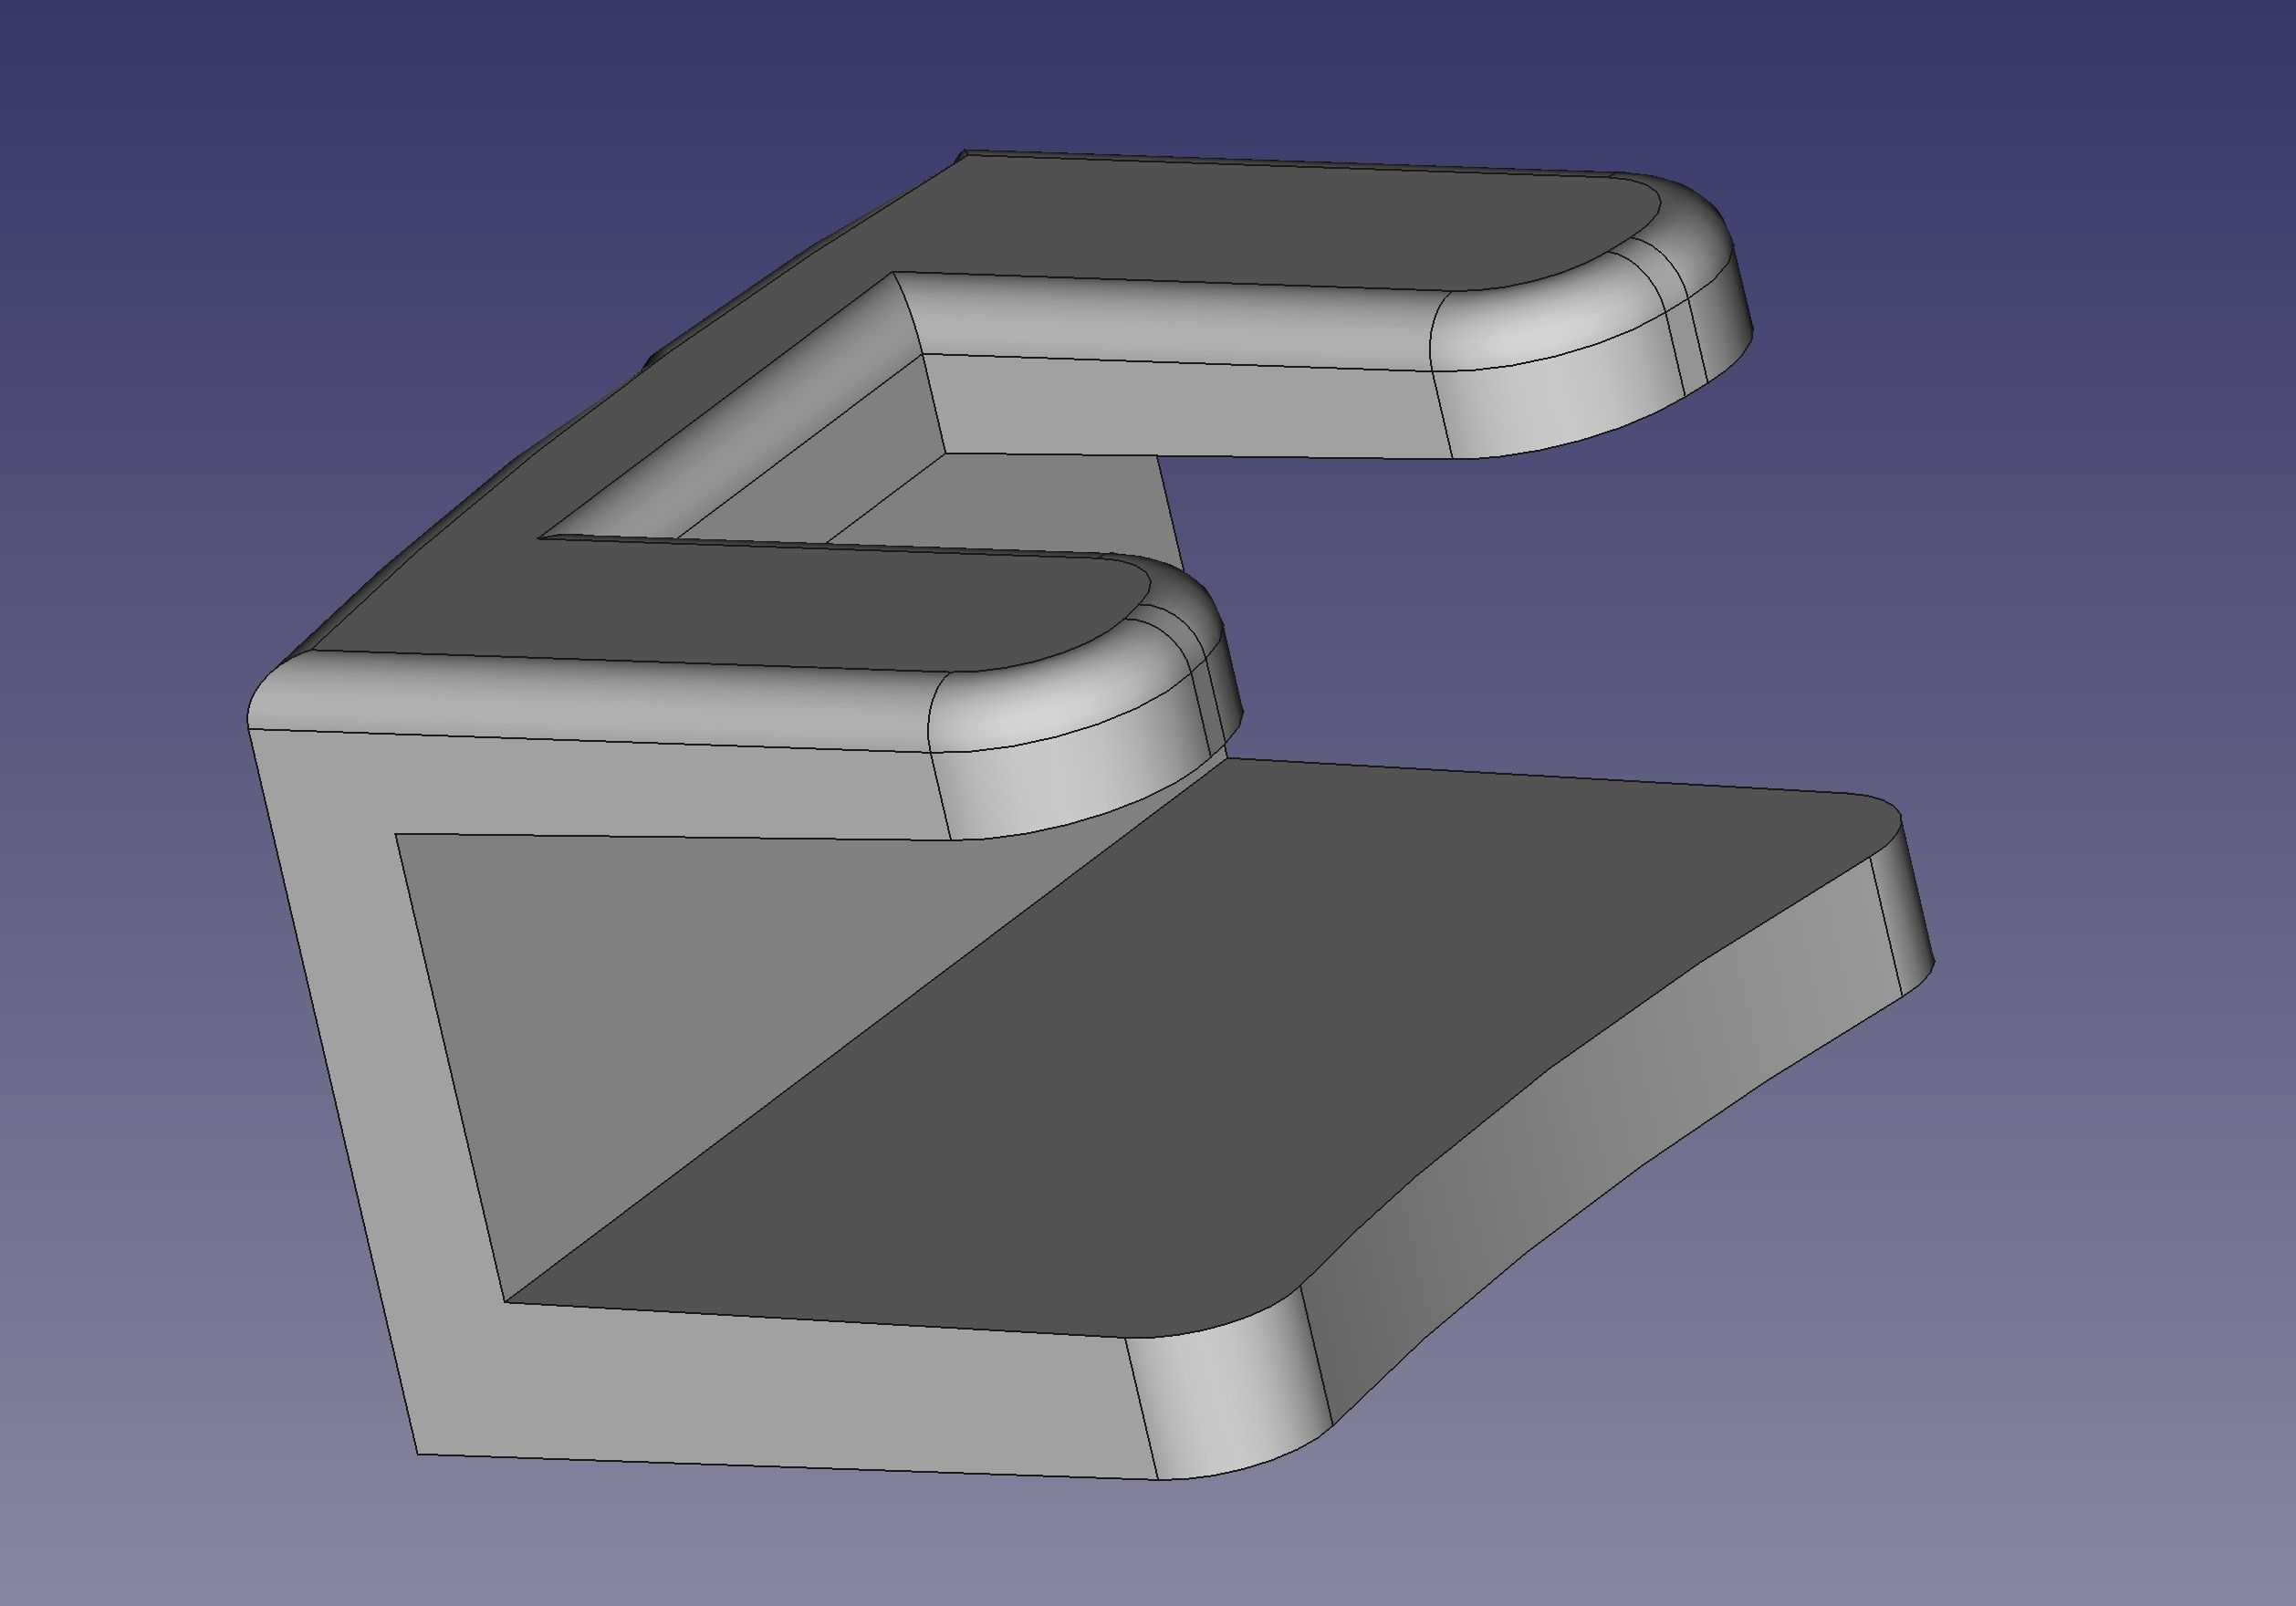
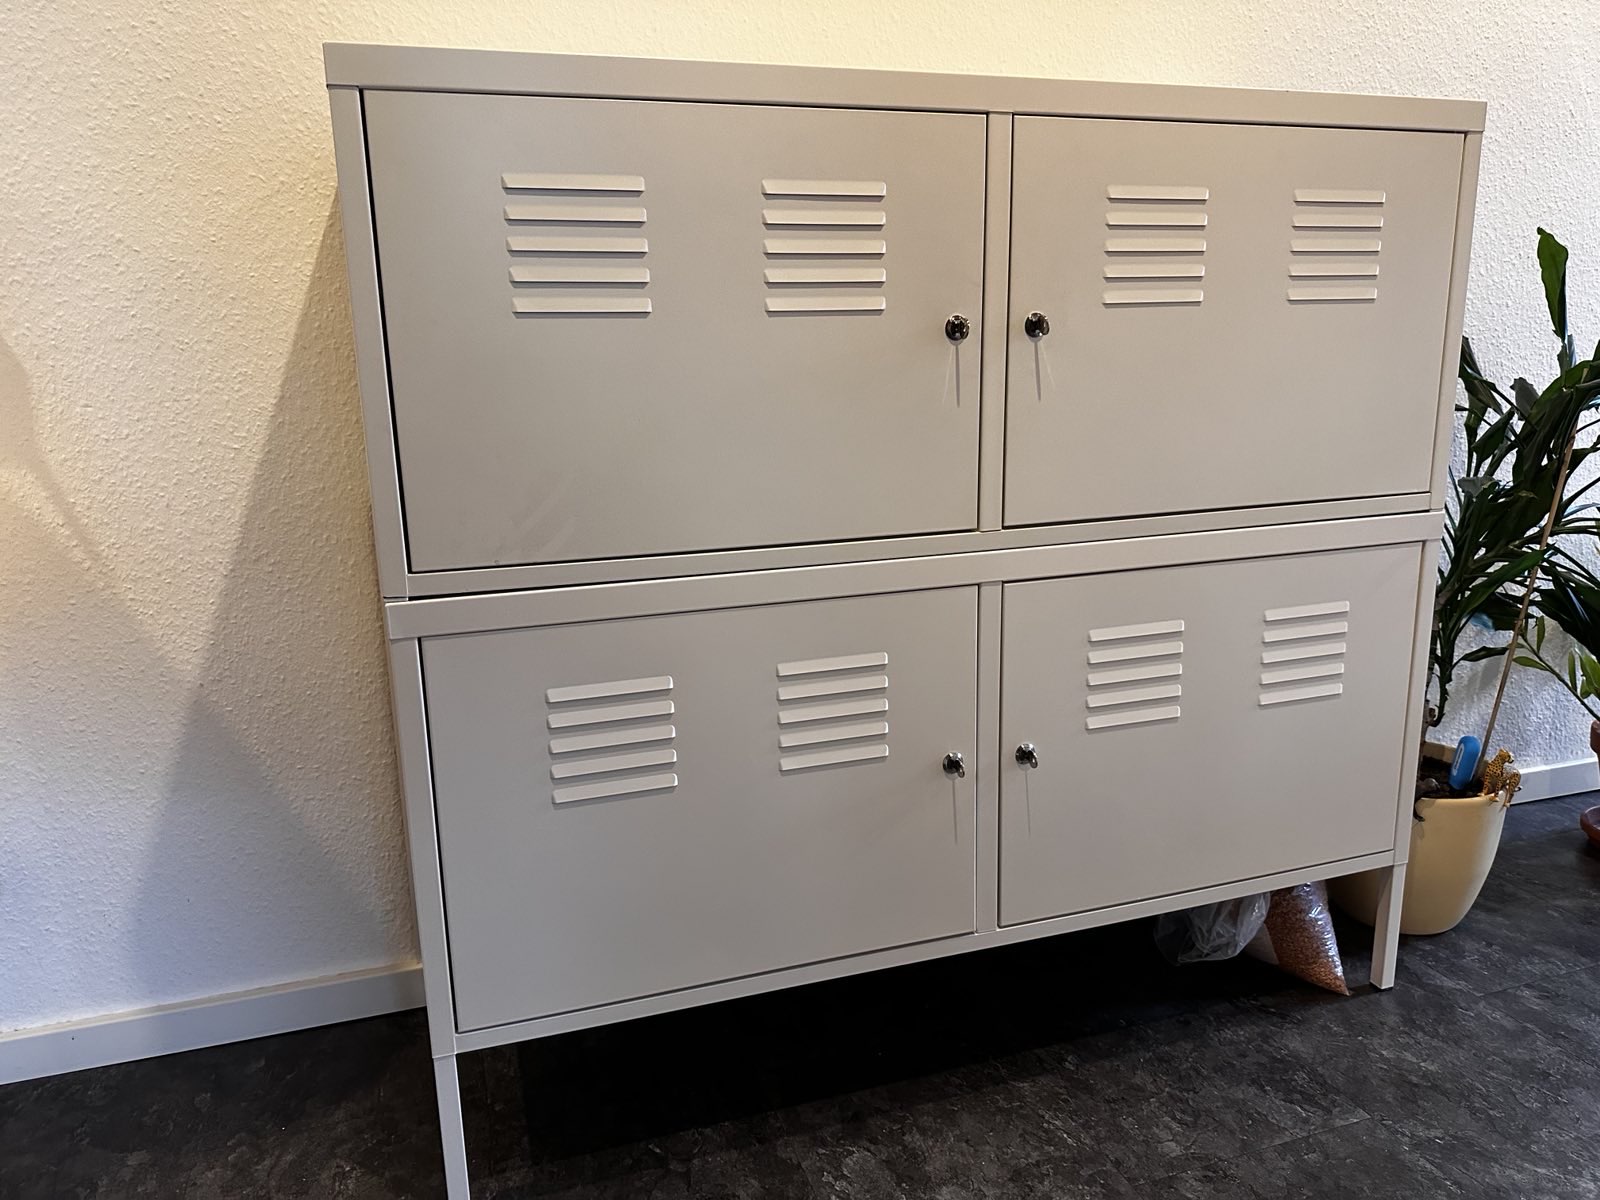
I put 2 of my
IKEA PS cabinets on top of each other. To do this, I sawed off the legs of the top cabinet. Because I had done
another project with the cabinet some time ago, I had of course wasted the end caps and needed new ones quickly. So I just designed a few replacement caps. Maybe someone else can use them, they fit all square tubes with an inner diameter of 17.5 mm and an outer diameter of 20 mm.
The endcaps at
thingiverse.
Printed with
Overture PETG on a
PRUSA I3MKs.
Transparency: I bought the products discussed in this post myself and I do not receive any benefits from the companies mentioned. Some of the links in this post refer to
affiliate links. If you buy one of the linked products, you are supporting me. The product itself will not cost you any more than usual. Thank you very much.
For my
Durst M605 colour enlarger I needed an adapter to attach a camera to the column and thus be able to use the enlarger as a very accurate repro stand. Unfortunately, the existing solution for the
M670 from oet does not fit, and I also find it quite difficult to print. So I constructed a new adapter from scratch that uses their camera mount, so that if you own both enlargers - which is quite pointless but nevertheless possible - you can continue to use them. The adapter itself follows simple shapes and can be printed without supports. For the attachment to the boom you need a M8x30mm hexagon screw and the
star knob from samyp.
Download my adapter
at thingiverse.
For the mounting of the adapter and the camera holder you still need
1x M8x30mm hex bolt and a M8 hex nut
2x M6 x25 nuts and countersunk screw
1x M4 x 30 nut and screw
1x 1/4" screw
Updates
2022/11/28:
Slightly changed dimensions (depth of the groove for the nuts)
Alignment of the adapter on the column facilitated by added indicator arrow
Our IKEA PS cabinet needed higher legs. Therefore, I have constructed a few extensions that make the cabinet 5 centimeters higher. The extensions simply slide into the square tubes after removing the caps. To increase stability, you can secure the extensions with
M5 bolts and nuts, so that nothing is guaranteed to wobble. I recommend drilling the necessary holes at the back of the legs. To facilitate the marking of the hole, I quickly made a drilling template: This instead of an extension push into the tube, through the 2 holes on the template mark the places where they must be drilled, or best of all immediately set a drill mark with a
center punch.
I recommend the use of
PETG. or
ABS, PLA might be too brittle. Best 25% infill. Print the parts lying flat on the printing plate to increase stability and to avoid predetermined breaking points, which might occur when printing upright. Set supports for the areas of the extension that will be inserted into the square tubes.
If something sticks: A few hearty blows with a hammer never hurt anyone ;-)
Here you can find the part at thingiverse.
Note: Some of the links in this post refer to affilate links. If you buy one of the linked products, you support me. The product itself will not cost you more than usual. Thank you.
 I use Küpper workshop furniture in my workshop. The equipment from them is, let's say "in the better DIY quality" category. (For a cabinet in industrial quality you often have to pay as much money as for half a workshop equipment from Küpper). Also from Küpper are the tool walls, which have their own "standard" regarding the hole spacing for the individual tool holders.
However: For my Felo ergonic screwdrivers as well as for Wiha screwdrivers with wooden handle or also the (planned) Wiha VDE screwdrivers there are only "universally" suitable, i.e. unsuitable holders. Therefore, I have constructed a few quick'n'dirty suitable holders on the fly.
Note: the links in this post refer to affilate links. If you buy one of the linked products, you support me. The product itself will not cost you more than usual. Thank you.
Download the Thing via thingiverse.
I needed a bezel lifter for the revision of my Kemmner Mechanik Turtle watch. Since the commercially available are simply too expensive for me, I make myself a homage to corresponding models on my lathe. As a preliminary step, I have designed the part as a 3D print to see if everything fits as I need it. Of course, the model must also work, but I can not say anything about the durability in a professional environment.
The tool is designed so that also inserts in other diameters can be made, I have added inserts for 44mm, 42mm and 40mm bezels.
Application: The two half-shells are connected with M4x30mm cylinder head screws, and the appropriate inserts are placed in the groove inside. The whole thing is then slipped over the bezel of the watch, so that the angled edge of the insert lies in the gap between the watch case and bezel. Now tighten the two screws alternately and with feeling. The clamping will lift the bezel off.
CAUTION: Do not use brute force. Even if the lifter grips the bezel, it is possible that it will be bent by brute force! Also remember that there is usually a spring underneath and a spring or rubber ring directly in the bezel ring, and that these tend to get loose. If the bezel is stuck with the lifter and won't lift off on its own, a slight turn clockwise or counterclockwise will usually help.
The bezel can be easily reassembled by pressing it back onto the case according to the mark on the inlay. This works best by hand.
Attention: The tool is licensed under Attribution-NonCommercial 4.0 International (CC BY-NC 4.0).
History:
2021/09/10: First Version
2021/09/11: Some small Improvements of the Inserts: Sharper Chamfer, height reduced by 0.2mm for better fit when using different filaments.
2021/09/13: Added new version with mounting for M4 nut. Filename: ClampingRing_NutSide.stl
Download
Ein nützliches Tool, das ich in unseren Breiten noch nicht gesehen habe ist der "Rose Indexer". Damit kann man Rundmaterial, das während oder nach der Bearbeitung in einem definierten Winkel im Schraubstock gedreht werden soll, schnell versetzen. Tubalcain hatte das kürzlich in dem Video hier verwendet, auf der Suche nach dem Tool musste ich dann angesichts des Preises schon schlucken, obwohl ich Kummer gewöhnt bin. Selber aus Alu anfertigen sollte relativ problemlos möglich sein, bedeutet allerdings auch einen gewissen Aufwand. Also erstmal nach einem Prototypen schauen und zufällig fündig geworden: Rose Index - Indexing fixture ist inzwischen ein "dauerhaftes Provisorium" bei mir, die Genauigkeit ist für den gedachten Zweck völlig ok, ich habe das in ABS gedruckt, ggf. können die Anschlagflächen natürlich bearbeitet werden. Wenn so ein Werkzeug ständig im Gebrauch ist, sollte das natürlich stabil gefertigt sein.
Warum nicht einen Teilapparat oder Collet Block nehmen? Die werden ja nicht überflüssig durch den Rose Indexer, der Anwendungszweck ist einfach ein anderer, zudem lässt sich so auch unrundes Material spannen. 
Vielleicht kann das ja der eine oder die andere brauchen. Hier ein Foto eines Versuchsaufbaus:
... weil der Rubin schneller weg ist, als man denkt. Dann mal mit der
Zodiac V6 CRB weiter machen, die liegt hier auch schon eine Weile und wartet auf solche Gelegenheiten.

Am 30.04.21 wollen wir unter dem Motto TAKE BACK THE NIGHT gemeinsam als FLINTAs auf die Straße und uns diese nehmen. Die Nächte sind weiterhin oft eine Bedrohung für viele, insbesondere für uns Frauen, Lesben, Trans- und Interpersonen. Dies soll nicht so bleiben, sie sollen uns gehören und wir werden sie uns nehmen. Lasst uns unsere Wut sichtbar machen und uns die Nacht zurücknehmen! (Aufruf zur Demo)
Es war eine kraftvolle, wütende und emotionale Demo, die sich am 30.04.2021 angelehnt an die feministische Tradition vom Spreewaldplatz in Kreuzberg auf den Weg nach Friedrichshain machte. Rund 2000-3000 Frauen, Lesben, inter, nichtbinäre und trans Personen demonstrierten gegen alltägliche patriarchale Gewalt auf der Strasse, im Club oder in häuslichen Beziehungen. Für die Anerkennung von sogenannter Sorgearbeit, gegen die Ausbeutung unter Coronabedingungen, in Solidarität mit mutigen Feministinnen in Polen, Großbritannien, Mexiko und anderswo.
„Wir wollen uns von den Bullen, die oft genug nicht nur wegschauen, sondern selbst frauen- und transfeindliche Gewalt ausüben und uns die Liebig34 genommen haben, nichts gefallen lassen.“ So war bereits im Aufruf für eine offensive Demonstration mobilisiert worden. Auch wenn die Polizei mehrmals die Demo wegen mangelnder Abstandsregelungen stoppte, liess sie sich nicht aufhalten und zog laut mit viel Rauch, Pyro und Feuerwerk bis kurz vor den Endpunkt in Friedrichshain, wo sie sich selbst auflöste.
Zu den Fotos beim Umbruch Bildarchiv.
Der Wunsch, eine PostgeSQL Datenbankunterstützung für eine Filamentdatenbank bei einer frischen OctoPrint Installation nachzurüsten wurde abgelehnt. oprint/bin/pip install psycopg2 ergibt:
Looking in indexes: https://pypi.org/simple, https://www.piwheels.org/simple

Collecting psycopg2

  Using cached psycopg2-2.8.6.tar.gz (383 kB)

    ERROR: Command errored out with exit status 1:

     command: /home/pi/oprint/bin/python3 -c 'import sys, setuptools, tokenize; sys.argv[0] = '"'"'/tmp/pip-install-eaezo9u5/psycopg2_570f9f228a2746e5b69eb4577ade54b4/setup.py'"'"'; __file__='"'"'/tmp/pip-install-eaezo9u5/psycopg2_570f9f228a2746e5b69eb4577ade54b4/setup.py'"'"';f=getattr(tokenize, '"'"'open'"'"', open)(__file__);code=f.read().replace('"'"'\r\n'"'"', '"'"'\n'"'"');f.close();exec(compile(code, __file__, '"'"'exec'"'"'))' egg_info --egg-base /tmp/pip-pip-egg-info-42q59a0p

         cwd: /tmp/pip-install-eaezo9u5/psycopg2_570f9f228a2746e5b69eb4577ade54b4/

    Complete output (23 lines):

    running egg_info

    creating /tmp/pip-pip-egg-info-42q59a0p/psycopg2.egg-info

    writing /tmp/pip-pip-egg-info-42q59a0p/psycopg2.egg-info/PKG-INFO

    writing dependency_links to /tmp/pip-pip-egg-info-42q59a0p/psycopg2.egg-info/dependency_links.txt

    writing top-level names to /tmp/pip-pip-egg-info-42q59a0p/psycopg2.egg-info/top_level.txt

    writing manifest file '/tmp/pip-pip-egg-info-42q59a0p/psycopg2.egg-info/SOURCES.txt'


    Error: pg_config executable not found.


    pg_config is required to build psycopg2 from source.  Please add the directory

    containing pg_config to the $PATH or specify the full executable path with the

    option:


        python setup.py build_ext --pg-config /path/to/pg_config build ...


    or with the pg_config option in 'setup.cfg'.


    If you prefer to avoid building psycopg2 from source, please install the PyPI

    'psycopg2-binary' package instead.


    For further information please check the 'doc/src/install.rst' file (also at

    <https://www.psycopg.org/docs/install.html>).


    ----------------------------------------

ERROR: Command errored out with exit status 1: python setup.py egg_info Check the logs for full command output.
Was sich nicht sofort daraus erschließt: Es fehlten ein paar Bibliotheken: sudo apt-get install libpq-dev python-dev. Danach lässt sich die Datenbankunterstützung problemlos nachrüsten.