Skip to content

Karcher / Kärcher WD-Series Adapter to 50mm hose / DN 50 tubes

In order to increase the suction power of my Kärcher WD 3.300 M (but should fit all Kärcher vacuum cleaners with standard hose like the WD3) workshop vacuum cleaner, it is possible to increase the hose diameter from the 38mm inside diameter (40 outside diameter) to a whopping 50mm. In particular in connection with the well-known Chinese cyclone dust separators, the suction power increases significantly. But not only with this, even without a cyclone, the efficiency of the Kärcher vacuums can be significantly improved.

I designed the hose adapter as a combination solution. You can either use a 50mm spiral hose or use the adapter with 50mm HT pipes! When using spiral hoses, I recommend additionally securing the hose with a hose clamp. Please note that the hoses that I show in the one photo tend to contract when you turn on the vacuum.

I printed the adapter in PETG from Goedis. PETG is elastic and resistant to oils such as those found in my workshop. Be careful of static electricity and make sure that it is properly discharged! You can pull some earth wire through the hoses to discharge the static charge. This must be laid from the beginning of the hose to the dust container and be earthed.

When printing, please only activate supports from the platform and manually set supports in the locking groove. The internal hollow locking mechanism is otherwise blocked by supports that cannot be removed. (See the sawn part in the last picture.)

At this point I would like to point out the excellent Kärcher WD-Series hose socket to DN 50 adapter from ralondo. The thing is the counterpart to my adapter, it enables, for example, the connection of hoses to HT50 pipes.

Download & more @ thingiverse


I hope the adapter is useful for you. Some of the links are suggestions for parts to replicate the thing and affiliate. If you buy something, I get a small commission. The price you pay is the same. Thank you very much.

Aufgehübscht: Ixion BST 18295/56

Zustand vor der Restaurierung
Vor einiger Zeit ist mir eine alte Dame zugelaufen, eine Ixion BST, Seriennummer: 18295, gebaut im Jahr 1956 bei der gleichnamigen Hamburger Traditionsfirma, die leider vor einigen Jahren insolvent ging. Ich konnte die Maschine von einem Betrieb in der Nähe kaufen, zum Glück gab es keine Bohrschäden am Tisch oder versteinertes Schmierfett in den Lagern. So konnte ich die Bohrmaschine ohne allzu großen Aufwand Industrie 4.0 fähig ein wenig flott machen, die Restaurierung erfolgte ohne irgendwelche baulichen Veränderungen an der Maschine selbst - das heißt, sie ist komplett im Originalzustand, bis auf das Bohrfutter, das im Laufe der Jahrzehnte sonstwo verloren ging. Da die Maschine einen B16 Kegel hat und mit der Firma Albrecht auch ein guter Anbieter n der Nähe ist, war das kein Problem. Ein zeitgemäßes Schnellspannbohrfutter NCBF draufgedengelt und fertigt ist die Laube.

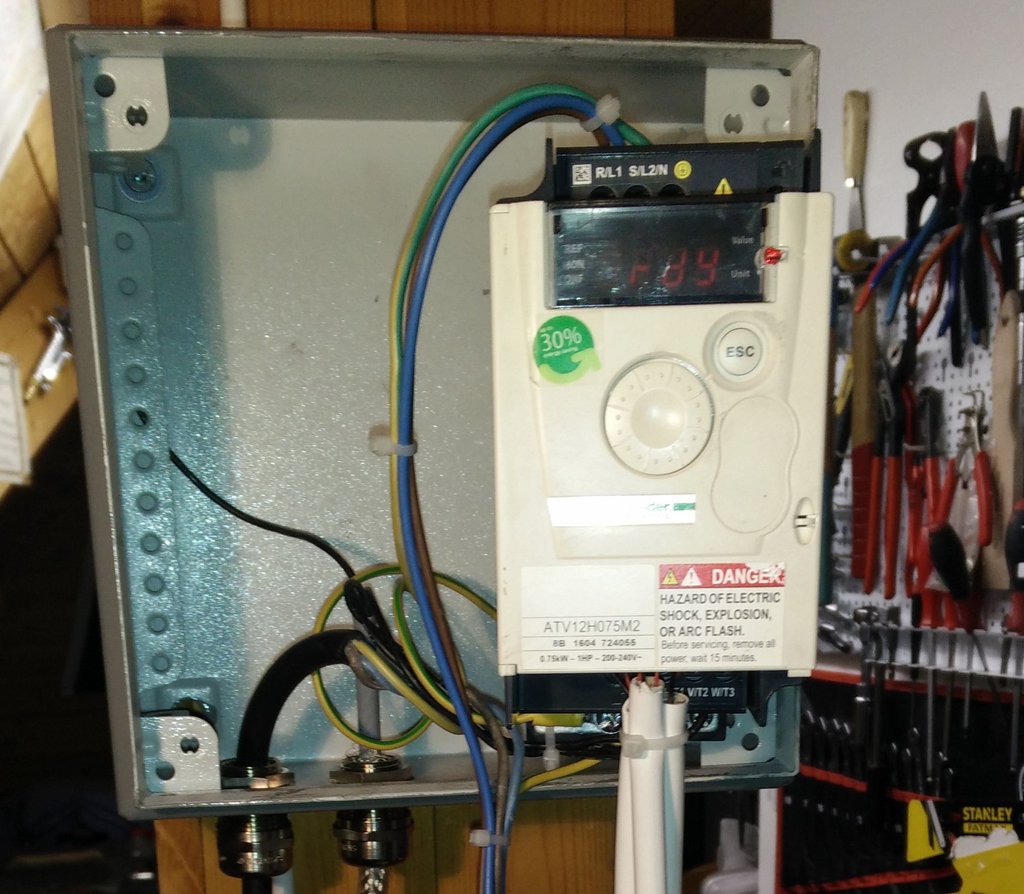
Da ich immer noch zu faul bin, Drehstrom zu verlegen, habe ich den Antrieb von 380 (400) Volt Drehstrom auf 230 Volt Wechselstrom umgebaut, d.h. einen Schneider Altivar 12H075M2 Frequenzumrichter als Umspannwerk vor den Motor gesetzt. Dieser hat die folgenden Motordaten:

VDE 350, Type D
PS 0,55
Hz 50
Volt: 220/380
KW 0,4
n=1400
Amp 1,75 / 1,0
cos: 0,77


Das passt halbwegs, da die Maschine nicht 24/7 laufen muss, sondern nur ab und zu für ein paar Bohrungen. Beachtet werden muss bei Dauerbeanspruchung die Isolationsklasse, die in dem Fall zu klein für die FU-erzeugten Spannungsspitzen ist.

Die Bestellliste für weiteren Elektokleinkram, ich habe bei Conrad bestellt, geht sicher auch billiger, aber das Ding soll zuverlässig arbeiten:
Schaltschränkchen mit herausklappbarem Frequenzumrichter

Bestell-Nr.: 442823 - 62 Draht-Potentiometer Mono 2 W 2.5 kΩ TT Electronics AB 3114306801 1 St. 38,55 €*
Bestell-Nr.: 700241 - 62 Adapterplatte für Frontbefestigung (B x H) 30 mm x 40.8 mm Eaton M22-A 1 St. 2 Stück 2,35 €* 4,70 €*
Bestell-Nr.: 521009 - 62 Installations-Gehäuse 200 x 200 x 120 Stahlblech Licht-Grau Rittal KL 1502.510 1 St. 49,64 €*
Bestell-Nr.: 183411 - 62 Drehknopf mit Zeiger Schwarz (Ø x H) 20 mm x 17 mm Mentor 4311.6131 1 St. 1,42 €*
Bestell-Nr.: 535531 - 62 Kabelverschraubung M20 Messing Messing LappKabel SKINTOP® MSR-M 20x1,5 1 St. 5,32 €*
Bestell-Nr.: 527074 - 62 Kabelverschraubung M20 Messing Messing LappKabel SKINTOP® MS-SC-M 20X1.5 1 St. 9,96 €*
Bestell-Nr.: 700242 - 62 Kontaktelement 1 Schließer tastend 500 V/AC Eaton M22-K10 3 St. 4,91 €* 14,73 €*
Bestell-Nr.: 527013 - 62 Gegenmutter mit Erdungskrallen M20 Messing Messing LappKabel SKINDICHT® SM-PE M20 2 Stück 3,32 €* 6,64 €*
Bestell-Nr.: 700709 - 62 Wahltaste Schwarz 1 x 40 ° Eaton M22-WRK 1 St. 13,05 €*
Bestell-Nr.: 700711 - 62 Wahltaste Schwarz 2 x 60 ° Eaton M22-WRK3 1 St. 12,85 €*
Bestell-Nr.: 1233815 - 62 Not-Aus-Schalter mit Kontaktelement 240 V/AC 6 A 2 Öffner DECA A20L-V4E02Q6R IP65 1 St. 13,25 €*
Bestell-Nr.: 602720 - 62 Steuerleitung ÖLFLEX® CLASSIC 110 CY 4 x 1.50 mm² Transparent LappKabel 1135904 Meterware 2 Meter 3,19 €* 6,38 €*
Bestell-Nr.: 716243 - 62 Skalenscheibe selbstklebend 0-100 270 ° Mentor 8133.2241 1 St. 0,68 €*
Bestell-Nr.: 183398 - 62 Abdeckkappe Schwarz Mentor 4311.0031 1 St. 0,27 €*

63 Jahre auf dem Buckel

Nach der Entfernung von 62 Jahre alten Farbschichten, der kompletten Überarbeitung aller blanken und der mit viel Farbe zugeschmierten Teile, darunter auch das Logo, nitrofester Grundierung und etwas 2K Staubgrau / RAL 7037 sowie Signalrot präsentiet sich die alte Schachtel wie neu. Ein Grund für den Kauf war die gute und solide Grundsubstanz. Bei den Vorbesitzern musste die Maschine nur als Senker / Entgratmaschine arbeiten. Exaktes Bohren auf Positionen ist mit der Maschine natürlich Übungssache, ebenso das Umrüsten. Durch den Frequenzumrichter ist jedoch der Drehzalbereich im Gegensatz zu vorher genau regelbar, auch bleibt das Drehmoment im Unterschied zur Steinmetzschaltung weitgehend erhalten. Bei dieser Schaltung wäre statt dem Freuquenzumrichterzeugs lediglich ein 30uF Anlaufkondensator notwendig gewesen.

Mein Dank gilt den KollegInnen in der Zerspanungsbude für die Unterstützung!

Tube and Rod Cutter for ProXXon IBS / E

Sometimes it is practical to use the ProXXon IBS/E to cut thin pipes or rods. And it would be nice if this could also happen at an angle of 90 °.

So I did a remix of the cool tool published by GreaseMonkey88 to cut small diameter rods or tubes using my ProXXon.

Unfortunately, the holder from ClaudioBitschnau probably only fits the Micromot devices from ProXXon with a smaller neck diameter (<20mm). So I redesigned the part from scratch with minor improvements, I also installed the great extensions from mettauk because I think they make sense: Two bench fixing holes to fix the base of this guide to a workbench or other solid surface.

The larger diameter of the ProXXon IBS/E made it necessary to change various other dimensions. So it is possible to use cutting discs up to 38mm. For example, you can also rob the Dremel Speed clic cutting discs. The clamping of the IBS / E is designed for maximum torsional strength, which is why it is only through a slotted hole that is clamped with an M4 x25 cylinder screw and an M4 nut. (Please tighten with feeling, it is still plastic ;-)

A height adjustment with easy adjust turn for M6 hex bolt or nut if using a cap bolt etc. simply Super glue the M6 nut to the bolt and thumb turn (after inserting through the guide)

You will need a small tube or rod with a 8mm diameter to connect the two parts. For a perfect fit you have to drill the hole for the shaft with an 8mm drill, but better with a 7.5mm drill and then with an 8mm reamer. The guide part might need some sanding to fit in the base, I wanted it to fit nicely with little play, just like the role model.

You also need an M6x30mm cylinder head screw and an M6 nut for height adjustment and an M4x12mm cylinder head screw and an M4 nut for clamping the ProXXon tool.

I've also added a modified support-block, for supporting the loose end of the tube/rod to be cut.

More Information and Download. License: CC BY-SA 3.0
Changes:

  • 2020/01/14: Added Insert for small Diameters and / or smaller (diamond) cutting discs Please be careful when sawing: the rest hangs in the air and can tear off uncontrollably!

  • 2020/01/15: I have changed the insert for the tool, it is now easier to remove from the base plate by simply lifting out on the protruding part. Cutting to size is now also possible with (diamond) cutting discs with a minimum diameter of 20mm. My hint is to print this part as shown in the last picture.

Some of the links are suggestions for parts to replicate the thing and affiliate. If you buy something, I get a small commission. The price you pay is the same. Thank you very much.

Mini UNO Card Game Box

Here is a box for the popular card game UNO in the "mini" version. This issue has flown to me in Thailand, unfortunately I've never seen it anywhere else. Meanwhile, the original box is somewhat scratched, so that something new had ago. Because of the unusual format was unfortunately no scaling of existing designs such as (thing: 145436) possible, which is why I then just designed the box from scratch.

Maybe someone can use the box, for easier opening a small "overpressure" opening is built in.

So, here ist is, printed with my AnyCubic i3 MEGA, with Filament from Alicia3DP: RED PLA. This Filament from Spain is very cheap, but can be processed well.

I suggest 15% infill, 0.20mm Height of Layer, 1,06% Flow, 220° Nozzle, 60° Heatbed and 100% Cooling. (I use an Titan Extruder and Sunon Fans, you'll try it with your Standard PLA Settings).
For the thin walls, I recommend to set Simplify 3D in the advanced options for External and internal Thin Wall Type to "perimeters only". Otherwise, there may be problems with the lettering.

Sources: thing:3785199. Due to recent problems with thingiverse currently downloadable only here: Case Bottom and Case Top.

Some of the links are Affiliate. If you buy something, I get a small commission. The price you pay is the same. Thank you.

Who thinks he has to complain because I link to evil Amazon: I am a organized trade unionist and have always advocated trade union organization of the working class, especially at Amazon. There are no "good" or "bad" capitalists. The total shit must be eliminated. We need a society liberated from the exploitation and suppression of man by man.

That being said, you do not mind that I give my ideas and the time I need for free use, right?

Makita RT0700 (Or Katsu and similar Clones) Router to Bosch / Malfell FSN Rail Adapter.

I use a lot of Bosch Professional hand machines in my workshop and have a matching FSN 1100 guide rail. Unfortunately, my beloved Makita RT0700CX2J router does not fit this rail. Buying a Makita rail and a matching adapter is out of the question, why do I have a printer? So I quickly made an adapter, which is suitable for my purposes. Except for a bit of filament you only need an 8mm x 160mm shaft to connect the router to the adapter. Even straight cutouts nothing stands in the way and you have saved a lot of money.

Speaking of money: I would be glad, if the adapter is also useful for you, that you visit with your next purchase perhaps one of the affiliate links here and order over it. For you, the purchased product is not more expensive, but I get a small commission for it.

And please note the license of this tool. No commercial use. Thank you!

BTW: The adapter should also fit with the Katsu routers and their clones. Due to the compatibility of the Bosch and Malfell guide rails, it is also possible that this adapter fits the latter. But that lacks me the experience. If he fits you: Write a comment.

So, here ist is, printed with my AnyCubic i3 MEGA, with Filament from Goedis: Black PLA.

I suggest 20% infill, 0.20mm Height of Layer, 1,06% Flow, 215° Nozzle, 60° Heatbed and 60% Cooling. (I use an Titan Extruder and Sunon Fans, you'll try it with your Standard PLA Settings).


Some of the links are Affiliate. If you buy something, I get a small commission. The price you pay is the same. Thank you.
Source: myself @ thingiverse

Caliper Depth Base / Depth Measuring Bridge for 6" / 150mm Mitutoyo Caliper (and others)

I needed a Depth Measuring Bridge for my Mitutoyo Digimatic Absolute AOS Caliper. (You can read my - german - Review of this Caliper here).
Because I needed it today (when else?), I "desingned" one from scratch. OK. The price was another argument for doing it instead of buying an original Part. :-/

I have also found that the measuring foot can also be used for other calipers, for example from Tesa, Blankenhorn or even these so-called $ 1.50 Things from aliexpress, ebay or Amazon. The caliper must not be wider than 16mm.

So, here ist is, printed with my AnyCubic i3 MEGA, with Filament from Goedis: Black PLA.

I suggest 20% infill, 0.15 mm Height of Layer, 1,06% Flow, 215° Nozzle, 60° Heatbed and 60% Cooling. (I use an Titan Extruder and Sunon Fans, you'll try it with your Standard PLA Settings). Also, I refer to add supports for the recess. See Screenshots.

You'll need a M4x8mm Screw to counter the Caliper in the Measuring Bridge. But do this with feeling and very carefully, because the part could bend and then the measurement accuracy is no longer given. In the worst case, you can also damage the flanks of your calliper!

I suggest also to print the measuring foot upright, that is, the measuring surface printed on the printing bed. This is most likely to give a good surface at the crucial points and a right angle. It should be clear that this part is only as good as your printer is calibrated. For serious purposes, I recommend buying the original.

But for sensitive parts for example, that thing is just right.

I recommend following sets of screws, so you have enough of them for the rest of the Week ;-) : 460 Countersunk Screws and 1080 Cylinder Head Screws.

If you need a left-handed version, just mirror it. But you will know that yourself. ;-)

31.05.:


  • Added Version with Threads on both Sides, so you can use the thing as left- or right handed

  • Added a 10mm higher Version with two more screw holes. So the caliper sits bombproof.


Some of the links are Affiliate. If you buy something, I get a small commission. The price you pay is the same. Thank you.

Airbnb & Co enteignen!

Foto: © Umbruch Bildarchiv
AktivistInnen der Initiative „Airbnb und Co. enteignen“ haben am 19. Mai eine über das Ferienwohnungsportal Airbnb angebotene Wohnung in der Hobrechtstraße 7 in Neukölln für mehrere Stunden zu einer Protest-Ausstellung umgewandelt. Mit Videos, Grafiken und Installationen thematisierte die Ausstellung den durch die rund 25.000 Ferienwohnungen erzeugten Verdrängungseffekt in der Stadt.

Zur Fotoseite beim Umbruch Bildarchiv

Links:

Demo gegen EU-Urheberrechtsreform

Foto: © Oliver Feldhaus / Umbruch Bildarchiv
Am 26. März wird im EU-Parlament über ein neues Urheberrecht abgestimmt. Europaweit sind am 23. März mehr als 150.000 Menschen für ein freies Internet und gegen die EU-Urheberrechtsreform auf die Straße gegangen. Der Protest richtete sich besonders gegen den Artikel 13 und den damit verbundenen Uploadfiltern. In Berlin beteiligten sich nach Angaben der Veranstalter rund 30.000 Menschen.
Zur Fotoreportage beim Umbruch Bildarchiv

Links:

Simplify 3d Profil für AnyCubic i3 MEGA mit Titan Extruder

Da es immer etwas frickelig ist, die richtigen Einstellungen für den Drucker herauszufinden - zumal wenn er "spezielle" Umbauten wie einen Titan Clone aus Shenzen hat - stelle ich hier mal mein Slicer Profil zur Verfügung. Das Profil ist für Simplify 3d in der aktuellen Version. Den Umbau auf einen Titan Extruder und die für Marlin notwendigen Änderungen an der Firmware habe ich ja hier schon erläutert. Inzwischen habe ich natürlich einiges kalibriert, so zum Beispiel die Fahrwege der 3 Achsen, womit die Maße der gedruckten Teile jetzt auf 0.02 mm stimmen. Bei mir lautet diese in der configuration.h so:
#define DEFAULT_AXIS_STEPS_PER_UNIT   { 80.80, 80.40, 396.432, 453.02}

Als Firmware empfehle ich momentan die von David Ramiro gepflegte Version, zu der es neuerdings auch eine mit BL-Touch Sensor Unterstützung gibt, die von David Ramiro und Marco Niedda zur Verfügung gestellt wird. Ich verwende diese, da ich mein Druckbett mit einem BL-Touch Sensor ausrichte..

In Zusammenhang mit dem Titan Extruder sollte bei der sehr empfehlenswerten, da dadurch bedeutend leisere Betriebsgeräusche entstehen, Umrüstung auf TMC 2208 Steppertreiber folgendes in der configuration.h geändert werden:
#define INVERT_E0_DIR true

Die Kalibrierung incl. Geschwindigkeitsoptimierung habe ich entsprechend Michael Laws Anleitung für den Ender 3 durchgeführt, ich empfehle, seine G-Code Dateien einfach auszudrucken, dann spart man sich doch einiges an Fummelei mit dem Slicer.


HINWEIS:
Alle gemachten Angaben sind ohne Gewähr auf Funktion und Richtigkeit. Für eventuell entstehende Schäden übernehmen wir keinerlei Haftung. Sämtliche Veränderungen geschehen auf Eure Verantwortung und Gefahr.

Irgendwie muss ich das alles finanzieren, daher sind die allermeisten Links Affiliate. D.h.: Solltet Ihr über diese Links zu einem Onlinehändler geraten und dort etwas bestellen, bekomme ich eine kleine Provision, für Euch ändert das am Preis natürlich nichts. Für die Inspirationen geht ein herzliches Dankeschön an die genannten Personen!
cronjob